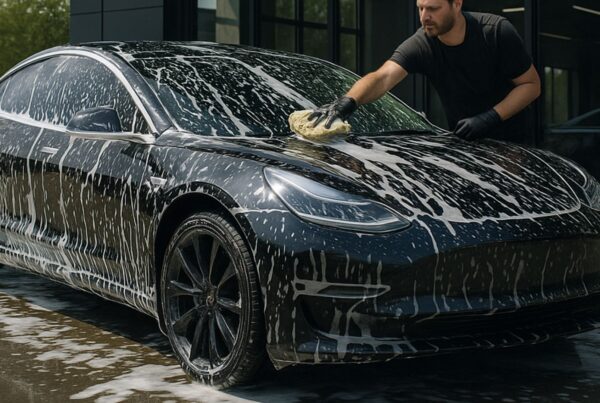
So, we’re going to throw you a change-up here in Car Detailing 101 – and explain why a professional detailer will recommend to clay bar a car during a full-service job. Clay bar treatment is the third step in the automotive detailing job. You’ll start with the wheels and tires, move onto washing the exterior – and then, the decontamination process.
If you missed the first few Episodes – here they are: Click the links below to stay up to date.
Car Detailing 101 – How to Detail a Car (an Overview)
Car Detailing 101 – How to Detail Wheels and Tires
Car Detailing 101 – How to Wash a Car During Detailing
Let’s dive right in. But, before you continue reading, watch this video by Adam Cote.
Why Is Important to Clay a Car While Detailing?
Detailing a car is not rocket science. But it certainly is amazing how many YouTube Certified detailers try to make it seem as such. Let’s be clear – the process of detailing is made easier when you understand the why’s – not exactly the how’s. This applies to using a clay bar kit or synthetic clay during a full detailing project.
The reason – the “how” or techniques / materials used will always vary based on the condition of the vehicle, type of paint, the quality of your paint finish or the car’s paintwork, even the time of day the job is completed. Regardless of how amazing your car shampoo is – or the type of super microfiber wash mitt, there are some contaminants embedded in the clear coating.
Every vehicle driving down the road is exposed to industrial fallout. Now – don’t freak out and assume that the local nuclear powerplant is experiencing issues.
Industrial fallout is another word for bonded contaminants or tiny metallic or ferrous-based materials. The most common source of this stuff is brake dust but pollution including carbon-based substances can also stick on paint. When fallout lands on the painted surface, it can embed itself into those microscopic imperfections found in clear coat of the paint job.
Eventually, the industrial fallout will start to yellow or turn brownish – which is a sign of oxidation. This will cause imperfections in the clear coat, eventually creating gaps in the coating, that can lead to the potential of rust.
During a detailing project, the intent is to remove ALL contaminants, so you can apply a protective coating on the car’s paint surface – traditionally a car wax or paint sealant. If the fallout is trapped in the clear coating, the coating – especially if it uses nanotechnology to penetrate those microscopic imperfections, simply will not bond or last as it should.
What are the Products You Can Use to Clay a Vehicle?
Automotive detailing clay or decontamination is essentially separated into three different categories – a spray or iron remover, a clay kit that includes the detailing clay bar and clay lube, or a clay bar detailing towel or mitt.
Spray on Fallout / Iron Removers
A growing trend with DIY detailers and some pros is the use of iron or fallout removal detailing spray. You’ll also hear the word rail dust associated with fallout. These products are formulated with chemical agents – usually pH neutral, that are designed to basically dissolve ferrous-based substances or bonded surface contaminants. This product is used commonly when detailing wheels – and if you remember Episode 1 – How to Detail Your Wheels & Tires – we used a product called American Release.
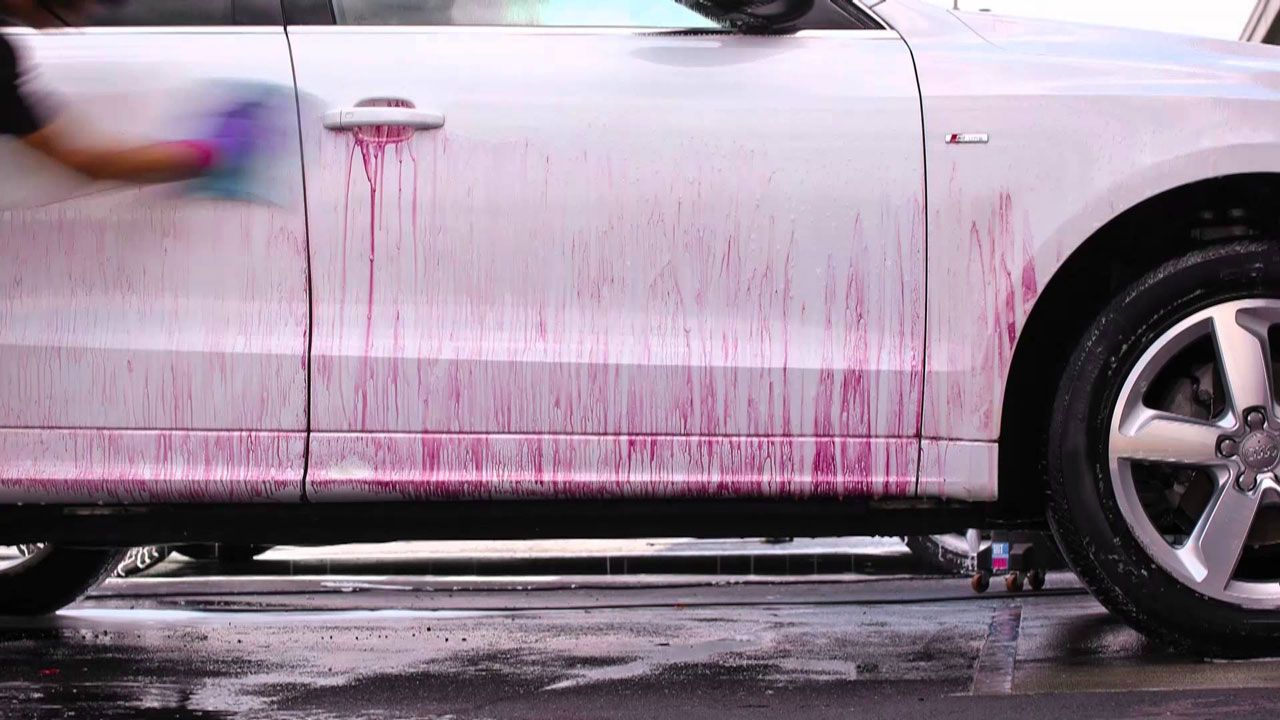
The purple you’re seeing here is due to the chemical solution in an iron or fallout remover spray – reacting with ferrous-based materials (iron). The most common source of paint contamination is brake dust, which is comprised of iron and other materials.
This solution can also be used on vehicle paint. If you prefer to use this product to remove paint contamination or decontamination – here are some general rules and steps.
- Always make sure the surface is wet first. The chemicals in an industrial fallout remover are very harsh – and smell God Awful. If you spray onto a substance that is dry, it can cause staining. Plus, when it activates, the pH neutral nature goes away – creating a strong base (or pH positive) reaction. The wet surface helps to dilute the reaction and reduces staining.
- Never spray in direct sunlight. Sunlight is another thing to avoid when using a fallout remover.
- Use outdoors whenever possible. This stuff doesn’t smell great. Make sure your area is well ventilated or use outside.
- Spray on the painted surface, let it dwell for a few minutes. Once you spray the fallout remover – you’ll start to see it activate when you notice a red or purple color on the vehicle’s surface. This is the chemical starting to ‘melt’ or breakdown the ferrous materials.
- Rinse off with fresh water. For optimal results, use a spot-free or de-ionized water.
Mild or Aggressive Clay Bar
The most traditional type of clay product is the old school clay bar. You’ll want to start by using a mild clay bar to reduce the potential of causing damage on the clear coat. To use this type of product, make sure to purchase a good clay lubricant spray – or make one by using a spray solution of pH neutral, wax-free car shampoo – mixed at a 5 to 1 ratio with distilled water (one part shampoo to five parts water).
The Clay Towel or Clay Mitt
If you want to speed up your claying, you might consider using a clay mitt or clay towel. These products will cover a larger surface area than the traditional clay bar. They work just as well – but are larger – so it covers more space than a regular bar.

There is a growing segment of detailers who are swapping to using clay mitts or a clay towel. They can cover more surface area per wipe down, which makes the process quicker.
How to Use Clay Bar & Clay Towels
- Spray a liberal amount of clay bar lubricant spray. You’ll notice in the video that we use our Pink Wipeout Hybrid waterless wash formula. You basically want to ensure your surface is well covered with a lot of lubrication.
- Start by rubbing the auto detailing clay or clay mitt gentle over the surface. You’ll know the clay is working when you’ve got a smooth surface becomes “slippery” or the clay glides easily.
- Work from top to bottom – left to right – and stick to using it on the same panel.
- Make sure to clean off the clay mitt or clay bar when it’s embedded with debris. A good idea is to use the same two buckets you used in the car washing step we mentioned in Episode 2 of Car Detailing 101.
- When you’re finished with the vehicle clay bar treatment, rinse with spot free water and dry with a high-quality microfiber drying towel.
When you clay a vehicle, the goal should be to leave yourself a perfectly clean and debris free surface to continue with the detailing process. The next step will be to buff your vehicle. This is also called paint correction – and to be honest, it’s the biggest or let me say – most complicated step involved in the exterior detailing job.
How to Remove the Need to Clay a Car
If you’re following our Car Detailing 101 video and blog series to learn how to do it yourself, you may want to consider streamlining the job by removing a few time-consuming steps. This can be accomplished by having a professional auto salon install Ceramic Pro 9H nano ceramic coating on your exterior and interior.
Ceramic Pro nano coatings are formulated for specific materials – meaning each coating is designed to bond and protect unique substrates. Cheaper DIY ceramic coatings claim to be all-in-one solutions, but usually hold up from a few months to 18 months. They work OK, but none of them are backed with a guarantee or warranty.
Each Ceramic Pro 9H package – whether it’s an entry-level Bronze Package (two-year warranty) or the lifetime protection of a Gold Package, we offer an option that fits your budgets, needs, and protection goals perfectly.
When you have a professional nano ceramic coating applied to your vehicle, future detailing jobs will remove the need for clay bar treatment, no more time-consuming chemical washes, and don’t even worry about polishing or buffing again. Ceramic coated vehicles shine better, stay cleaner for longer periods, and protect all surfaces from exposure to harmful contaminants and UV rays.
If you’d like to learn more about Ceramic Pro 9H nano ceramic coating, or to receive a free estimate from a certified Ceramic Pro auto salon near you, click the button below.